Shop Class Is Now in Session

Posted by: Matt Rieck 9 years, 12 months ago

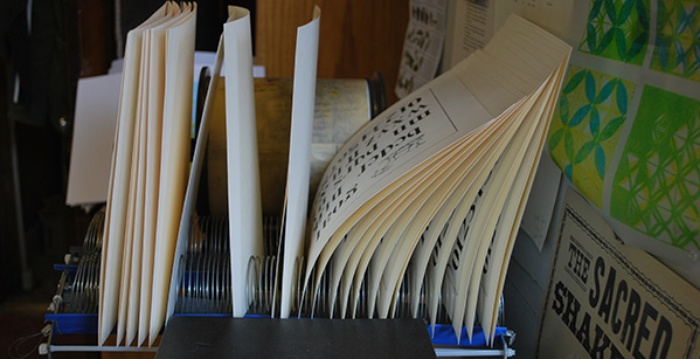
Last weekend Geri Instagrammed a photo of the drying rack at the Printing and Book Arts Center at the Genesee Center for the Arts and Education (that's a mouthful). Reaction was over the moon! I think the outpouring of love was based on the simple fact that the heart of the drying rack is the beloved Slinky®, favorite toy of child and adult alike.

(Fun Fact: Rochester, New York, is home to the National Museum of Play where the Slinky was inducted in 2000 into its "Toy Hall of Fame.")

— The Slinky Drying Rack's Journey to Greatness —

About a year ago a single Slinky Drying Rack appeared at the Genesee Center as an experimental solution to the on-going problem of where to dry freshly printed pieces in the space-constrained center. The single Slinky did not hold up paper larger than a postage stamp. The second revision beefed up the base but did not solve the paper-holding problem. The third and final revision added the second Slinky, which expanded the footprint, and the separators were added between the Slinky ribs. Voilá! Works like a charm.

We thought it'd be fun to show detailed photos of the Slinky Drying Rack's construction and provide instructions on how you could make your own. Full disclosure: I did not design nor construct this. These instructions are simply guidelines. Feel free to improve upon the design. OK, now lets put on our safety glasses and ear protection and get to work.

— Materials —

  • (2) full-size Slinky®
  • (1) bag of zip ties (minimum of 16 ties)
  • (1) 1/4" metal pipe (minimum of 38")
  • (4) 6" mending plates
  • (1) 90°-angle plastic (minimum of 38") I don't know exactly what this material is. My guess is that it's corner protection for material on a pallet.
  • (2) 1/4" threaded bolts
  • (2) 1/4" locking washer
  • (2) 1/4" nuts
  • (1) super thin metal wire
  • (8) crimping clamps

— Tools —

  • Hack Saw
  • Wrench
  • Screwdriver
  • Vise
  • Common Sense

— Instructions —

  1. Cut 90°-angle plastic into (2) 19" pieces
  2. Notch each end of plastic to butt up against mending plates
  3. Screw together (2) mending plates with (1) 1/4" bolt, locking washer, and nut so that (1) plate is overlapping the other
  4. Tighten zip ties in second hole of mending plates
  5. Cut off excess of zip ties
  6. Place 1/4" pipe in vise; using hack saw, cut 1/4" pieces of pipe for use between each rib of Slinky
  7. Sandwich 90°-angle plastic pieces between mending plates
  8. String (3) zip ties together to length of 90°-angle plastic and tighten between mending plates. Do not over-tighten
  9. String together 1/4" metal pipe pieces on super thin metal wire. Take note of how many you'll need to separate ribs of Slinky. One wire goes above the ribs all the way down, and the other wire goes below the ribs
  10. Stretch Slinky to length of 90°-angle plastic
  11. Position each 1/4" metal pipe piece between each Slinky rib. Do again with other Slinky
  12. Once certain Slinky ribs are properly separated, tighten super thin wire and crimp clamp

Post photos of your own Slinky Drying Rack.

Shop Class Dismissed.

— Photos —

Slinky Drying Rack

Slinky Drying Rack

Slinky Drying Rack

Slinky Drying Rack

Slinky Drying Rack

Slinky Drying Rack

Slinky Drying Rack in use this morning. One never finds it in the same place twice. Here it is sitting on a sled press, holding alphabet projects of students taking Letterpress I at the Genesee Center.


Comments
  • There are currently no comments


New Comment
required
required (not published)
optional